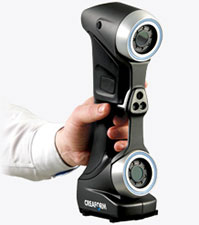
HandySCAN
 The HandySCAN 3D™ family of next generation hand-held scanners have been optimized to meet the needs of product development and engineering professionals that require the most effective and reliable way to acquire 3D measurements of physical objects.
Creaform’s flagship metrology-grade scanner underwent a complete redevelopment, building on its core assets. They are now more portable and faster than ever, delivering accurate, high resolution 3D data while remaining overly simple to use. Yet, it is their true portability that has changed the rules and set a whole new trend in the 3D scanning market.
HandySCAN 700™
The HandySCAN 700 offers increased accuracy and resolution. It is the most versatile 3D scanner on the market for inspection and demanding reverse engineering.
- 25 times faster than the previous generation
- 40% more accurate
- Improved ergonomy
- 35% lighter
- 50% smaller
- Greater freedom of movement
- Multi-function buttons for easier interaction with the software
TRUaccuracy: Accurate measurements in real life operating conditions.
- Metrology-grade measurements: Accuracy of up to 0.030 mm (0.0012 in.), resolution of up to 0.050 mm (0.002 in.), high repeatability and traceable certificate.
- Accuracy in real-life conditions: Regardless of environment conditions, part set-up or user.
- No rigid setup required: Optical reflectors are used to create a reference system that is “locked” to the part itself, so users can move the object any way they want during scanning sessions (dynamic referencing). Changes in surrounding environment have no impact on data acquisition quality or accuracy.
- Self-positioning: The HandySCAN 3D scanner is a data acquisition system and its own positioning system. This means that no external tracking or positioning devices is required. It uses triangulation to determine its relative position to the part in real time.
- Reliable: Consistent and repeatable results across all work conditions or environments.
- On-demand user calibration: The scanner can be calibrated as often as necessary (day-to-day basis or before each new scanning session). Calibration takes about 2 minutes and guarantees optimal operation.
TRUportability: 3D scanning where you need to go.
- Stand-alone device: there is no need for an external positioning system, arms, tripod or fixture
- On-the-go scanning: you can take it from place to place or use it in-house or on site
- Lightweight: weights under 1 kg
- Small: Fits into a case the size of a carry-on
- Easy access to confined spaces: thanks to its small size and flexible stand-off distance
- Speed: Fastest path from physical objects to your design or inspection workflow
Fastest 3D scanner on the market: 25 times faster than the previous generation.
Highest measurement rate among all laser scanners: 480,000 measures/s.
Automatic mesh output: Ready-to-use files, right as you complete acquisition.
Quick workflow integration: Usable scan files can be imported into RE/CAD software without post-processing.
TRUsimplicity: Overly simple 3D scanning process
- User-friendly: very short learning curve, regardless of the user’s experience level.
- Quick set-up: up and running in less than 2 minutes
- Direct mesh output: no complicated alignment or point cloud processing.
- Real-time visualization: look at the computer screen to see what you are doing and what is left to be done
- Versatile: virtually limitless 3D scanning – no matter the part size, complexity, material or color
To learn more contact below to get a hold of one of our representatives!
